Showing posts with label Sweets. Show all posts

Tuesday, June 7, 2016

Badam Halwa Recipe

     I remember tasting badam halwa only in marriages...That lovely butter paper wrap containing a single serving of halwa placed on banana leaf in the marriages is a bliss !!!  
     We have not tried badam halwa at home before. My MIL made this delicious sweet and sent it through my mom to USA. Thats when I tasted badam halwa at home. It was definitely yummier than the versions I had tasted before. Ever since the last spoon of halwa was over, I was craving for it so badly. Mom tried it on a small scale, getting the recipe from MIL. Even then I had an unquenchable greedy craving for some more of it. 
     My MIL and FIL are here with us this summer. I wanted to taste this yummy sweet again and was very eager to see how to make it. So I had asked her to make it sometime. Everyone went for shopping to Costco on a weekend and bought a big bag of Kirkland Almonds :P Right on the same day, she made this halwa for us and also for some of our friends. It took a lot of self restraint to not eat the Halwa while taking the pictures !!!! and waiting for the halwa to cool down to room temperature seemed like I had been waiting for ages :D

Prep Time: 30 mins || Cook Time: 25 mins || Yields: nearly 1.2 - 1.5 kg || Category: Sweet/Dessert 

Ingredients:

1. Almonds - 500 gm
2. Sugar - equal quantity as that of the ground almonds
3. Ghee - 500 gm
4. Saffron - few strands

Method:
1. To blanch the almonds,boil water and immerse the almonds in it. Let it sit in the boiling water for 2-3 mins. Switch off the flame and drain the water. Keep the badams immersed in cold water (tap water) for a min or two and then peel its skin. 
2. Grind the peeled almonds in mixi with some water to a crumbled state. Then transfer the semi-ground almonds to grinder and grind it to a very smooth paste adding some water as and when needed.
3. Take the badam paste in a heavy bottomed vessel. Measure sugar equal to the amount of ground badam paste and add the entire sugar, saffron to it and stir well. Switch on the flame and keep it in medium. The sugar will start to dissolve slowly. Keep stirring for 5-8 mins. 
4. Pour 1/4 amount of ghee initially. Cook for 10-12 mins with constant stirring and intermediately adding 1/2 the amount of ghee. The mixture will slowly attain yellow colour from saffron and ghee. Bubbles start to appear and it will splutter. Cook for 2-3 mins and then switch off the stove and pour the 1/4 portion of the ghee and mix well. If required, switch on the stove and cook for 2 mins with constant stirring.

Suggestions:
  • Blanching the almonds helps to peel off the skins easily, without soaking it for 3-4 hours.
  • If a more yellowish colour is required, a pinch of yellow food colour can be added. I do not prefer adding artificial food colour. So, I have left it as such with the natural colour given by saffron. 
  • Adding milk will reduce the shelf life of the halwa. Hence, I have not added it. 
  • Cardamom powder, condensed milk etc can be added if desired. As I wanted the original taste of badam halwa, I skipped these two ingredients. 
  • Keep refrigerated if longer shelf life is needed.

Stays good for 4-5 days in room temperature and for 10-15 days when refrigerated.

Tuesday, May 24, 2016

Rava Laddu Recipe

     Rava laddu is a very easy sweet to make. A lot of variations can be done in this. Mom had made this couple of times, when she was here in USA. The most recent one was on a weekend, specially made for our first wedding anniversary. She made it along with thattai. 
     Even before making this version of laddu, I had been picturing it mentally, to make use of the kutti krishna doll, presented by Venkat, Mani's friend during Golu. :P What a planning !!!
Generally we don't make much of this laddu. Even if we do, it would be a simple version of roast and grind rava, add sugar, ghee, roasted cashews and shape them into laddus. But, this time, the occasion being special, we made this with some more additional ingredients - cardamom powder, raisins and sweetened coconut flakes (as it was readily sitting in the fridge :D). Ultimately, with so many ingredients, this version turned out to be rich and yummy !!


Prep Time: 10 mins || Cook Time: 20 mins || Yields: 9 || Category: Festival sweets/Laddu

Ingredients:
1. Rava - 1 cup (100-150gm)
2. Sugar - 3/4 cup
3. Ghee - 2 to 3 tbsp
4. Cashews - 10 to12 broken
5. Raisins - 10 to 15 (optional)
6. Dessicated coconut - 2 to 3 tbsp (optional)
7. Cardamom powder - 2 tsp
8. Salt - a pinch

Method:
1. Dry roast rava till nice aroma wafts. Then mildly powder it in a mixi. (should still be a little coarse ). In the same kadai, heat ghee.  
 2. To the heated ghee, add cashews, raisins and fry till the cashews turn brown and the raisins look bloated. Then add grated coconut/dessicated coconut and roast well. Reduce the flame to low and then add the coarsely ground rava. Mix the ingredients well.
 3. Then add powdered sugar and then increase the flame to medium.  Add cardamom powder, edible camphor, salt and mix well until all the ingredients have blended and then switch off the flame.  Cool the mixture in a plate. When the heat is moderate enough to handle, make small laddus out of it

Suggestions:
  • If desired, sprinkle 1/4 cup milk after adding powdered sugar and mix the ingredients well. Adding milk gives a binding effect but it reduces the shelf life of the laddus.
  • I did not add edible camphor as I don't like its smell.
  • I used ready-made sweetened coconut flakes.
  • If the mixture looks a little sticky, refrigerated it for 15-20 mins and then shape them into laddus. 

Monday, November 30, 2015

Boondhi Laddu Recipe

     Boondhi laddu is one of the sweets that we usually make with ease for Diwali. I had been looking forward to try this sweet on my own. Had taken the final pics one day and the step wise pics the other time, as making the sweet + taking the pics makes it very tiresome !!! Apart from shaping the sweetened boondhis as laddus, we also have a practice of filling them in metallic cones which is traditionally called Parupu Thengai, finding its place in TamBrahm marriages and other auspicious functions. Though the Paruppu thengai is popular with sweet boondhi, it can also be made with many other fillings like, sweetened cashews, jaggery coated groundnuts, manoharam (jaggery coated thenkuzhal) etc.
     My mom is an expert in making laddus. She made big laddus in 3 batces for my engagement :) (I helped her a little in holding the laddle firmly, measuring the raw materials etc :P and then gobbling 2 or 3 laddus at every stage in return for my help !!)
     Also one special mention about these laddus is that they are adorning my blog as the 50th post in the completion of a 6 month old blogging journey !!! 

Prep Time: 20 mins || Cook Time: 50 mins + 20 mins for shaping laddus || Yields: 35 to 40 laddus || Category: Sweet

Ingredients:
1. Gram flour (Besan flour) - 3 cups
2. Sugar - 3 cups
3. Cooking soda (Sodium Bi-carbonate) - a pinch
4. Salt - a pinch
5. Food colour (red) - a pinch
6. Oil - as required to fry
7. Ghee - 4tbsp
8. Cardamom powder - 2 tsp
9. Sugar candy (diamond kalkandu) - 3 tbsp
10. Cashews - 10 to 15
11. Cloves - 8 to 10


Method:
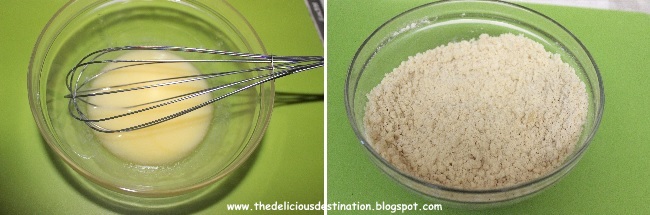
1. Measure equal parts of besan flour and sugar separately and keep aside. For sugar syrup, dissolve the measured sugar in water (just needed for immersing the sugar in) and then switch on the stove. 
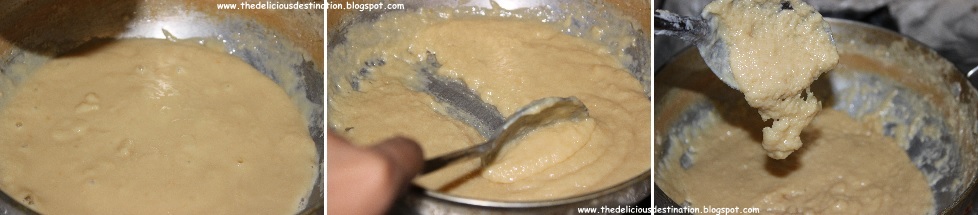
Add a pinch of sodium bi carbonate and a pinch of salt to the measured besan flour and mix well. Slowly add water and make a batter of slightly thick consistency. 
 2. Allow the sugar syrup to boil and reach a single string consistency. Switch off the flame. After 2-3 mins, add food colour and mix well. (I added a few drops of water to a pinch of food colour and mixed well and then transferred it slowly to the sugar syrup with constant stirring). Parallely heat required amount of oil in a kadai for making boondhi.
 3. Check the hotness of oil by dropping a little amount of the batter. If the batter rises and comes to the surface, the hotness of the oil is sufficient. Take a boondhi laddle and pour some batter on it and spread with a laddle quickly. Once the boondhis have occupied the space in the kadai, stop spreading with the laddle and clear the batter from the boondhi laddle into the batter container.
 4. Stir and turn the boondhis to their other side, to ensure uniform heat during the cooking process. After 2-3 mins, take the boondhi using a perforated laddle and transfer to the hot sugar syrup.
 5. Repeat the above process until all the batter is over. Finally, fry the cashews in ghee, cloves in oil (the cloves will splutter, so make sure to stand away from the hot oil) and add to the boonhis added to the sugar syrup. Also add cardamom powder and sugar candy and hot ghee and mix well. When it is warm enough to handle, make small rounds and set them aside for cooling.


Suggestions:

  •  If the batter is made to rest for a while, it slightly ferments. So, the batter for boondhi,  sugar syrup should be made parallely. As the sugar syrup gets done, say about 75% done, oil should be heated parallely for frying the boondhis. 
  • While making the sugar syrup, do not switch on the flame, until all the sugar has dissolved completely in normal water. If the sugar solution is heated, even before the sugar dissolves, it will lead to a brown syrup with caramelised sugar.
  • After adding the fried boondhis to the sugar syrup, if the stickiness of sugar is found to be less, then heat ghee and add to the boondhi in syrup which will make the sugar syrup become loose in the hotness of the ghee.
  • Also, boondhis can be added from hot oil directly into the sugar syrup, which will retain the sticky nature of the sugar syrup making it easy to shape them into laddus.


Yummy home-made boondhi laddus are ready !! They stay good for 8-10 days unrefrigerated.

Friday, October 23, 2015

Badhusha Recipe

     I have not been a very big fan of Badhusha from anytime back. It is just that I get curious about its name everytime :P After coming to USA, deprived of good readymade sweets and savouries from sweet shops, I started to try each sweet and so I landed in here, with the making of Badhusha. The toughest part is standing patiently near hot oil, gazing dreamily at the badhushas to get ready soon, while they have just started to cook :P 

Prep Time: 15 mins || Cook Time: 35 mins || Yields: 12 || Category: Sweet

Ingredients:

1. Maida - 1 & 3/4 cups
2. Cooking oil - sufficient to fry
3. Melted butter - 1/4 cup + 2tbsp
4. Salt - a pinch
5. Curd - 1 tbsp
6. Sodium bi-carbonate (cooking soda) - 1 tsp
7. Sugar - 2 cups
8. Cardamom powder - 2 tsp
9. Saffron - few strands (optional)
10. Water - as required
11. Lemon - 1

Method:
1. Mix melted butter, 1 tbsp of cooking oil, cookign soda, curd, a pinch of salt and 1 tbsp of sugar (if desired) into a smooth paste.
2. To this add maida and mix to form a crumbly mixture initially and then add water little by little to knead into a smooth non sitcky dough.
3. Divide the dough into equal sized rounds and shape them into traditional badhushas or the ones with swirls. For the normal badhushas, take a round and press it gently and make a dent in the center. For the swirl rimmed badhushas, press the round gently, pull the rim outwards, pinching it slightly fold it inwards and repeat the process till the entire rim has been made.
4. For making sugar syrup, in a container add sugar and pour water just sufficient to immerse it and keep stirring in medium flame. When bubbles arise and the syrup thickens, check for one string consistency (the syrup when taken in between two fingers should leave a fine string which should last without getting cut). At this stage, add cardamom powder, saffron and switch off the flame. Add lemon juice and stir well to avoid crystallization of the syrup.
5. Meantime heat oil and test the hotness by dropping a pinch of the dough, which should immediately rise above. At this stage, swtich off the flame and add the badushas one by one with enough distance between them. Let them get cooked for a min. Then flip the badushas and continue cooking until the bubbles and the noise subside.
6. Switch on the flame (after the bubbles and noise subside) keeping it in medium, cook all the badushas with intermediate stirring and flipping to ensure uniform light brown colour and drain them in a tissue.
7. Transfer the badushas to the sugar syrup. If the syrup is cool, just warm it up a little so that the syrup will be absorbed into the badushas well. Rest for about 10-15 mins so that the sugar syrup gets thickened on the badhushas.

Suggestions:

  • Can also add a cashew/badam or any nut into the dough balls before shaping them.
  • If desired, can add rose essence or any fruit essence for flavour.
  • Adding saffron is optional.
  • It is better to cook the badhushas soon after they are shaped. Other wise they get dry and form cracks.
  • If there are many cracks in the shaped badhusha, they might tend to break when frying in oil.
  • In the swirl shaped badhushas, the outer rim will be slightly crisp and the inner part will be soft, unlike the normal badhusha which will be soft throughout.
  • Tastes soft and yummy after a day, absorbing all the flavours. 
  • Need not refrigerate.

Wednesday, August 19, 2015

Palkova / Thirattipal (Homemade - from the scratch recipe)

     Palkova/Thirattipal is my all time favourite sweet. Sentimentally, wanted to make the 25th post as some sweet. At the same time I was so much craving to have palkova. I did not want to use condensed milk & wanted to make it from scratch using just milk & sugar. All it needs is a lot of patience to stir and to wait to stir and to wait..... 
     Long ago, during my school days, paati used to make this whenever she boils milk and it turns curdled. I never liked her idea of making palkova from curdled milk. But finally I give up some of my stubborness & ego & do have a few spoonfuls of it :P It tastes good too.
After some days, we somehow gave up this way of making palkova & switched over to the below proper version. 
    Patience is one of the must-have ingredient for a successful palkova without ready-made condensed milk. It took me about 1 hour to get the end product successfully. Unable to stand for such a long time, I pulled in a high-chair and settled down with a bottle of drinking water and a laddle to stir, with the camera hanging around my neck :P It was definitely a funny sight for anyone who came into the kitchen. But, such a patiently made palkova got over within 2 days !!!
    And one very important pre-condition as per me is to talk a deal with someone at home & bribe someone with additional spoons of palkova, so that they can scrub & clean the kadai for you, after palkova is made :D

Cook Time: 1 hour || Yields: 2 cups (in the cup used to measure milk) || Category: Sweets / Milk Sweets

Ingredients:
1. Milk - 8 cups (I used 2% fat milk)
2. Sugar - 1 & 3/4 cups 

Method:
1. Measure and pour the required quantity of milk in a heavy bottomed kadai / metallic pan. Keep the flame in high & let the milk boil. 
 2. Keep stirring in between to ensure the milk does not overflow from the kadai. Before it rises till the rim of the vessel, during boiling, reduce the flame and keep stirring. Add the sugar and keep stirring in medium flame. Alter the flame to medium or high as necessary & keep stirring. The colour will change from white to creamy/buttery white.
 3. Scrap the inner walls of the vessel for the deposited cream and drop that into the boiling milk. After about 35-40 mins, colour will completely change to creamy white & small bubbles will arise. 
 4. Keep stirring as the milk starts to thicken. This will happen around some 45-50 mins. If a portion of the thickened milk is moved aside with a laddle, it will take time to come back to its position & will reveal the bottom of the vessel. This is the time from which more care is needed. The thickened milk will attain a dropping consistency.
 5. At this stage, keep stirring the palkova. It will show a slightly granular consistency and move as a thick mass with browning of sides of the vessel. Switch of the flame at this point & transfer the palkova to a storage bowl.

Suggestions:

  • I prefer this palkova to be plain & raw with just these 2 ingredients. If you wish, you can add condensed milk in addition to milk. 
  • Adding condensed milk will reduce the process time.
  • Depending on the amount of condensed milk added, remember to reduce the quantity of milk & sugar.
  • This version of palkova will not be ideal for shaping them as pedas. For that using condensed milk gives a better form to handle. This version is perfect for a cup & spoon kind of serving.