Showing posts with label Breakfast. Show all posts

Tuesday, April 19, 2016

Gobi Matar Paratha Recipe (Cauliflower Peas Paratha)


     I had been crazy about stuffed parathas since long time. Long back the only stuffed paratha, I knew to be existing was aloo paratha :P Then it took me a some time to realise that there are n number of variations that can be made in stuffing the parathas. My addiction for parathas, in addition to their taste is for the reason that they dont need a separate side-dish  :D
     In my training days at TCS in Ambattur, I remember standing in the long queue for aloo paratha during those very short intervals given between the forenoon and afternoon sessions. :P 

Prep Time: 10 mins || Cook Time: 25 mins || Yields: 6 || Category: Paratha/Stuffed paratha

Ingredients:
1. Cauliflower - 1 small / 15-20 florets
2. Turmeric powder - 1 tsp
3. Salt - as required
4. Green peas - handful
5. Oil - 2 to 3 tbsp
6. Jeera (cumin seeds) - 2tsp
7. Green chilli - 1 small
8. Garam masala - 1 tsp
9. Cumin powder - 2 tsp
10. Chili powder - 1/2 tsp
11. Asafoetida - 2 tsp
12. Wheat flour - 200 gm
13. Ghee - 2 tbsp (optional)

Method:

1. Add turmeric powder, salt, hot water in a tray and dip the cauliflower florets and leave it aside for 5 mins. Then wash and grate the cauliflower florets. 
2. In a pan, heat a tbsp of oil and temper with mustard, split urad dal, cumin seeds, finely chopped green chili. Add in the grated cauliflower and saute for 2-3 mins.
3. After the cauliflower has got partially cooked, add green peas, salt, garam masala, pepper powder, cumin powder, hing and salt. Mix well and keep covered for a min or two.
4. Mash all the ingredients well and cook for few more mins. Make regular chappathi dough with wheat flour, salt and 1 tbsp of hot oil. Make balls of desired size and press evenly with hand/ rolling pin to a small circle. Place a tbsp of the stuffing and cover it up with the chappathi dough. 
5. Seal the stuffing completely within the dough and spread it evenly into moderately thick parathas. Heat a dosa pan and cook the parathas with ghee/oil smeared on both the sides. If required, dab all around the paratha with a clean kitchen cloth and cook it evenly until brown spots appear.


Serve with curd topped with roasted jeera powder or pickle.


Tuesday, November 3, 2015

Akki Roti Recipe (Rice flour roti)


     A famous breakfast dish from Karnataka's cuisine. Apart from this one-liner intro, for me personally, it carries good memories of my college days. In college, I had a kannadiga friend from whom I got to taste this roti during lunch. With the few rotis she brings for herself, she would also share a piece with us, the other 3 second benchers :)  Thats when I got hooked to its taste and aroma. Few months back I got this recipe from her over whatsapp. And I tried it out yesterday evening. Thanks Apoorva !! It turned out good and we enjoyed a new dish :)
     In a way it reminded me of the verum arisi adai (plain rice flour adai) that we make with a more liquid form of batter with murungai keerai. I can now add this dish, to the group of quick fix tiffins that can be made without a conventional dosa/idli batter.

Prep Time: 10 mins || Cook Time: 25 mins || Yields: 4 || Category: Breakfast/Tiffin

Ingredients:

1. Rice flour - 250gm
2. Onion - 1 (small)
3. Green chillies - 1 or 2
4. Hing - 2 tsp
5. Cumin seeds - 2 tsp
6. Grated coconut - 2 tbsp
7. Coriander leaves - 2 tbsp (finely chopped)
8. Ginger - 1 tbsp (finely chopped)
9. Salt - as required
10. Oil - as required

Method:

1. Mix the rice flour with finely chopped onion, green chillies, grated coconut ginger, hing, cumin seeds, coriander leaves and salt. 
2.  Add warm water little by little and make it a soft dough. Divide the dough into equal sized balls. Take a ball and spread it evenly on a butter paper/aluminium foil/banana leaf, greasing the hand with oil, slightly.
 3. Meanwhile heat a dosa pan or a wok. Carefully transfer the roti to the hot pan and cook in medium flame. Make a small hole in the middle, for the roti to get cooked. Cook covered for a min.
 4. Flip the roti to the other side drizzling enough oil. Cook the roti until it is slightly golden. Enjoy it hot with tomato chutney or any tangy dip of your choice.

Suggestions:

  • For a crunchy texture, add 2 tbsp of bengal gram (soaked for 30 mins in water & drained) or hyacinth bean (broad bean/avaraikkai).
  • Can also add finely chopped dill leaves for added flavour.
  • Always have the flame in medium for getting uniform well cooked rotis.
I had the roti with a tangy Amla pachadi..


Wednesday, October 28, 2015

Aloo Matar Sandwich (Potato Peas Sandwich)


     Sandwich is a filling and easy-to-do breakfast recipe, with many different variations that can be incorporated to make it interesting. The basic one is with boiled potato as the main ingredient. As I boil the potatoes and store it in the fridge the previous night, making this recipe is even more easier and quicker. With a compelling task of using up the pack of bread which was nearing its expiry in a couple of days, I chose to go with sandwich than bread upma as the latter would have taken little more efforts in cutting vegetables etc :P
I used up the remaining masala as a stuffing for masal dosa.


Prep Time: 5 mins || Cook Time: 15 mins || Yields: 8 triangles || Category: Breakfast


Ingredients:

1. Oil - 2 tbsp
2. Cumin seeds - 2 tsp
3. Urad dal - 2 tsp
4. Turmeric powder - 1 tsp
5. Hing - 2 tsp
6. Onion - 1 big
7. Boiled potato - 2 medium
8. Pepper powder - 1/2 tsp
9. Chilli powder - 1 tsp
10. Amchur powder (Dry mango powder) - 2 tsp (optional)
11. Salt - as required
12. Coriander leaves - 2 tbsp
13. Green peas - a handful
14. Bread slices - 8
15. Butter - as required

Method:

1. Add oil to a pan and temper with jeera, urad dal, turmeric powder and hing. Add chopped onions and saute until it starts to beccome golden brown,
2. Now add the boiled and mashed potato, pepper powder, chilli powder, amchur powder, salt and mix well.Cook for about a min.
3. Now add the green peas and coriander leaves and give a quick stir. Switch off after a min or two. Spread the masala on to a bread slice and cover with another.
4. Add butter to a hot pan and place the sandwich over it. 
5. After a min or two, turn the sandwich to other side and cook for a min until it becomes slightly brownish. If desired, cut the sandwich into triangles and serve hot.

Suggestions:

  • Butter can also be replaced with ghee. 
  • Any combination of filling can be used for the sandwich, like spinach, corn, grated carrots etc.
  • The sandwich can also be made in a sandwich maker. As I didn't want the sealed triangles which we get when using a sandwich maker, I made it on a tawa.
  • The brown rims can be cut and discarded before making the sandwich.
  • Amchur powder can be skipped. I added it for a slight tanginess.
  • Can also stuff in a slice of cheese or grated cheese if desired.

Some pomegranate kernels and orange juice along with the sandwich made it even more a filling breakfast.

Thursday, October 1, 2015

Sambar Idly (With hotel sambar recipe)

     There are not many vegetarian restaurants here nearby.. Even with the one or two located here, the quality & taste of food is worser. The immediate thought of the lack of good restaurants will create some crazy craving in me, with me imagining my days in Chennai @ office and often at Hotel Saravana Bhavan in office :P This will make me long for every item one by one from the menu of HSB that I had tasted for all the 5 days :) Yesss.. that's why I goto office too :) With a longing for sambar vada, I settled down to Sambar Idly, as Idly and sambar (the day when I tried Hotel Sambar !!) where readily available at home one day :D

Prep Time: 3hrs soaking time + 30 mins grinding + overnight fermentation || Cook Time: 25 mins + 45 mins || Serves: 2 || Category: Breakfast/Tiffin

Ingredients:

1. Idly  - 6 
2. Sambar - 3 cups
3. Onion -  1 small (finely chopped)
4. Coriander leaves - 1 finely chopped
5. Ghee / Gingelly oil - 1 tbsp (optional)

Method:

1. Place 2 or 3 idlis on a plate or in the serving dish. If required, heat the sambar.
2. Soak the idlis in piping hot sambar. Add a tbsp of finely chopped onion on each of the idlis. Sprinkle some finely chopped coriander leaves over the idlis and in the sambar. If desired, drizzle some ghee / gingelly oil on top of the idlis. 
Rest it for a few mins so that the idlis absorb the sambar. 

Tastes greaaaatttt with a cup of hot coffee !!

Tuesday, September 29, 2015

Idly (How to grind idly/dosa batter in mixie)


     Idly is the most common comfort food of South Indians and is also the most convenient one to make. It is good for health as it is a steamed dish. As a recipe, Idly has never failed me :P always the softer and softest it turns out to be... Whenever we have to head for important meetings in the mornings or plan to go for an outing, Idly would be topping the menu, with each person getting their separate pack of idlis dipped in chilli powder and gingelly oil !!! As I don't prepare separate batter for idly & dosa, everytime the routine follows making idlis twice, then dosa, followed by onion oothapam or kuzhi paniyaram.
     Though it is a common recipe, how can it be called a food blog without this !!! Plus, I wanted it to be documented, as I often get a confusion as to whether the rice is 3 parts or the urad dal is 3 parts :P Every time I get confused, I recollect my mom's saying "If you put 3 parts of urad dal, then you wont get idlis but you will have to be sitting and making only medhu vadais the whole day" 

Prep Time: 3 hours soaking time + 30 mins grinding || Cook Time: 25 mins || Yields: 15 || Category: Breakfast/Tiffin, Steamed dishes


Ingredients:

1. Raw rice (Idly rice) - 3 cups
2. Whole urad dal - 1 cup
3. Fenugreek seeds - 1 tsp
4. Salt - as required
5. Hing - 3 tsp

Method:

1. Wash idli rice and whole urad dal separately and soak for a minimum of 3 hours.
2. Soak 2 tsp of fenugreek along with urad dal. Adding fenugreek gives softness and good flavour to the idly/dosa.
3.If you find in the meantime, that the grains are short of water, add some more water as required.  After 3 hours, the rice and urad dal would have bulged in size absorbing water. Drain the water from urad dal and add it into a mixie jar. Add little amount of water to assist smooth grinding.
4. Keep checking the consistency of urad batter for every 2 mins. Open the mixie jar and add water if necessary and give a stir with the spatula. Continue grinding to get a smooth paste. It took around 5-6 mins for me to get a smooth batter with 2 breaks in between to avoid overheating of the mixie's motor.
5. Transfer the ground urad dal batter to a large container and add some salt and hing to it. In the same mixie jar, add the drained rice to more than half and less than three fourths of the jar's capacity. Add less water and grind slowly into a smooth paste, in multiple batches. (I ground the soaked rice in 2 batches for a total of 6 rounds, with 3 rounds of grinding and intermittent checking for each batch)
6. Keep checking for the consistency of the ground rice batter. The batter tends to become dry sooner. But if the batter becomes too runny, it will take longer time to grind. So, add water accordingly.
7. Once it is ground to a smooth paste, transfer it to the same container in which the urad dal batter has been poured into. Mix both the batters well with clean hand. (Mixing with hand is preferable, as it helps in better fermentation of the batter. (But I always use a spatula or a long laddle to avoid messy hands. It still gets fermented overnight may be taking a little extra time)
8. Keep the batter covered overnight  for 8-10 hours or more/less hours depending on the climatic conditions of the region where you live. After the resting period, the batter would have fermented and risen towards the brim of the container. Before using it for making idlis, mix well with a long laddle and check for the consistency and add salt if required.
9. Grease the idly plates generously with gingelly oil and pour the batter into each mould a little less than its level or just equal to the level. (If using cloth for making idlis, make the cloth damp and squeeze the water from it. Spread the cloth on the idly plates and pour the batter onto the dents.) Add water in the idly steamer sufficiently and stack the plates inside the container and close the lid.

10. Keep in high flame initially for 5 mins and then switch to medium flame for 6-7 mins. Once the idlis are cooked, the aroma starts coming out of the steamer. The cooked idlis, will get cracks on their top surface. If you still want to check for the doneness, insert a spoon or a knife which should come out without the dough sticking to it.

Suggestions:
  • Rather than mixie, using grinder for making the batter, yields softer idlis. (As I dont have a grinder here, I rely on mixie ground batter)
  • Mixing the rice and urad dal batter with hand, instead of a laddle or spatula, helps in quicker fermentation.
  • Do not fill the entire container with idly batter. Leave some space between the surface of the flour and the lid of the container giving room for the batter to ferment and rise.
  • There is also a practice of adding a long spoon or laddle into the container having idly batter, as it avoids the flour overflowing after fermentaion (Should be working fine but I have not tested it though, as I use a considerably larger container for storage).
  • At any point during steaming, if you find a burning smell or a noise from the steamer, take out the plates and check for the level of water in the container.
  • I generally grind the urad dal first and rice at the last, as washing the mixie jar is easier with remnants of rice batter than the sticky remains of urad dal batter.
  • Keeping the batter filled container in a large plate helps in collecting the fermented and overflown batter overnight, if any. It also makes cleaning the outer part of the container and the resting platform/table mess free.
  • Some have the practice of adding a handful of poha while grinding the batter, as it gives softer idlis. (I have not tried this, as the without poha version itself works great for me.)
  • Comparing the cloth version with the non-cloth version, softer idlis are undoubtedly guaranteed with the cloth version.
  • Though there may be many different ratios, I follow the ratio of 3:1 for Rice:Urad dal always and it has been yielding softer idlis.
     I gulped the idlis with red chilly chutney, milagai podi & milagu kuzhambu !!! With a drizzle of gingelly oil over the hot idlis.

Friday, August 7, 2015

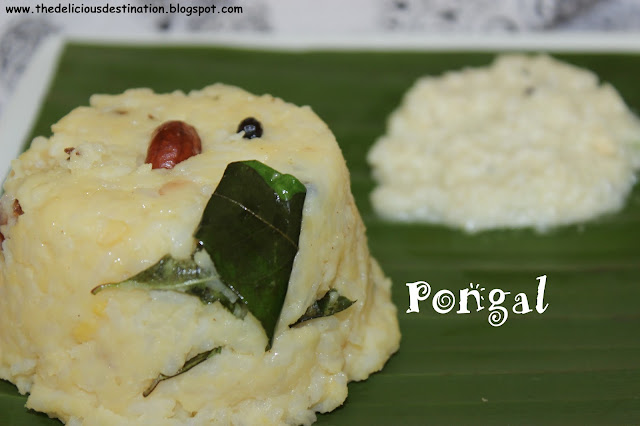
Pongal / Venpongal

     Pongal is one of the quickest one-pot breakfasts that many of us might be preparing with ease. It is in general a key neivedhyam for the harvest festival - Pongal. But we prepare only the sweet version of it during the festival. This venpongal does not demand much standing near the stove or stirring periodically. I go for this mostly on a weekend, when I have no patience to stand for even half an hour for the breakfast process :P
     This dish, apart from the ease of making, also keeps hunger at bay for longer time than the other breakfast items, giving a lavish time for the preparation of next course of meal :D

Cook Time: 30 mins || Serves: 3 || Category: Breakfast

Ingredients:

1. Raw rice (pacharisi) - 1/2 cup
2. Moong Dal - 1/2 cup
3. Water - 3 cups
4. Ghee - 3tbsp
5. Ginger - 2tsp
6. Cashews -10/15
7. Cumin seeds (jeera) - 2tsp
8. Whole black Pepper - 2tsp
9. Hing (asafoetida) -3tsp
10. Salt - as required

Method:
1. Wash moong dal and raw rice together. Add 3 cups of water to it and pressure cook for 4-5 whistles. Can add a spoon of ghee (optional) in the pressure pan , to avoid burnt bottom or browned rice and dal.
2. Mash the rice and dal, add ghee and mix well. In a pan add 2tbsp ghee and temper with jeera, pepper (should splutter). Then add cashew, chopped ginger, hing & lastly add the curry leaves and transfer the tempering to the pongal and mix well with required amount of salt. 

Suggestions:

  • Adding a little ghee along with rice and dal in pressure pan gives a good texture.
  • Soaking the rice and dal mixture for 30 mins before cooking enhances the texture and taste.


Serve with coconut chutney or any gotsu..

Thursday, July 30, 2015

Godhumai Ravai Upma (Broken/Cracked Wheat Upma)

     Broken wheat / Cracked Wheat / Dalia / Godhumai Ravai  is a nutritious way of consuming wheat as this is not polished. It does not lose out on any of the nutrients which are generally found in whole wheat. Broken wheat serves as a good source of our regular requirement of magnesium and fiber, low in calories and is loaded with nutrients.
     It is high in fiber, a nutrient that offers significant protection against cancer.This contributes to maintaining a healthy body weight. It lowers the risk of type 2 diabetes, reduces the risk of high cholestrol & cardiovascular disease & high blood pressure when consumed regularly. 
     During childhood days, I never used to have a liking for this item in any form - be it in upma or sweetend or salted kanji. The only form I liked it was in Payasam/ Kheer prepared with coconut milk :P  I used to dread this upma & call it as "Mann Upma" in Tamil as it resembles sand particles :D But the aversion has now completely changed and we have it once in a week for breakfast. Trying to include it in Kanji, in salads & in other forms too. 
     Now over to the recipe !!!

Cook Time: 25 mins || Serves: 3 ||  Category: Breakfast

Ingredients:

1. Coconut Oil - 1 tbsp
2. Mustard seeds - 1 tsp
3. Bengal gram (Kadalai Paruppu) - 2tsp
4. Curry leaves - 1 sprig
5. Ginger - 2tsp finely chopped
6. Hing (Asafoetida) - 2tsp
7. Red Chillies - 2
8. Salt - as required
9. Grated coconut - 3tbsp
10. Broken Wheat (Godhumai Ravai) - 1 cup
Method: 

1. Heat coconut oil in a pan and add mustard seeds. Once they splutter add bengal gram, ginger, red chillies, hing & curry leaves and saute in medium flame till bengal gram turns golden brown. Now add 3 cups of water and bring it to boil.

2. Add grated coconut and required salt to the boiling water and cook for a min. Then add a cup of wheat rava with constant stirring.
3. Stir well and make sure there are no lumps. Cook covered for about 5-7 mins. 
4. Check for the doneness & if required add one more cup of water and adjust the salt level and cook for 3-5 mins until the rava has got completely cooked. 

Suggestions: 

  • From the time I remember, we had been using coconut oil for this dish, as it renders a unique aroma. Any other oil can also be used. 
  • Can also add vegetables like carrot, beans, peas etc.

This can be served with any chutney or simply with sugar. I had it with idly milagai podi. !!!

Tuesday, July 28, 2015

Spicy Bread Upma


     Bread Upma is one such recipe I never even tried or thought about when I was in India. Here we buy bread every week and its liking fades away in a day or two :D Then the pack lies abandoned for 2 more days on the counter or over the fridge. Then I check for its expiry and keep reminding myself to use it up well before the date. Only then I started making Bread Upma where I could get to use most of the slices and without a heavy heart discard only the top and bottom most slices :P 
     Apart from various types of sandwiches, toasts, plain bread with butter or jam, this is one other alternative to consume bread adding a tasty twist to it. 
     Have made this multiple times in the last few months and tried it for a potluck too.
With whatever vegetables available at hand, this dish can be made within 30 mins & with no compromise in taste. 

Prep Time: 5 mins || Cook Time: 25 mins || Serves: 3 ||  Category: Breakfast/Kids Recipes

Ingredients:
1. Onion - 2 medium sized
2. Tomato - 2 big
3. Capsicum - 1 small
4. Ginger - 2tsp finely chopped
5. Turmeric Powder - 2tsp
6. Garam Masala - 2tsp
7. Chilly Powder - 3tsp
8. Tomato sauce - 1 tbsp
9. Salt - as required
10. Channa (Chickpea) - 50gm boiled [Optional]
11. Oil - 2tbsp
12. Mustard seeds - 1tsp 
13. Cumin seeds (jeera) - 2tsp
14. Bengal Gram (Kadalai Paruppu) - 2tsp 
15. Coriander leaves - 2tbsp finely chopped
16. Lemon - 1 small [Optional]
17. Bread slices - 8 or 9

Method:

1. Chop all the vegetables, ginger and coriander leaves. In a pan heat oil & add mustard. Once it splutters, add bengal gram, jeera in reduced flame. Once they are golden, add the chopped onions & turmeric powder and saute for 3-4 mins or until half cooked.
2. Add the chopped capsicum, chilly powder & garam masala & saute for about 3-4 mins or until the capsicum is roughly cooked. Add chopped tomatoes & required salt and saute till the tomatoes turn mushy. Now add the boiled chickpeas and tomato sauce for flavour enhancement. Adjust salt, chilly powder as required. Cook for about 2-3 mins and switch off the flame.
3. Now add the bread cubes & mix well. Top with coriander leaves. If needed, squeeze a little amount of lime juice & mix well.

Suggestions:

  • The vegetables added here are only suggestive. This can be altered with any combination of vegetables of one's choice and availability. It can also be left as a simple upma with just sauteed onion, curry leaves, ginger and green chilis.
  • The brown rim of the bread can be and discarded and only the white part can also be used.
  • As I am okay with the taste of the brown edges, I left them as such.
  • Adding lemon juice and tomato sauce are optional.
  • If adding lemon juice, it is always better to add it after the flame is switched off, as it might give a bitter taste otherwise.
  • Can also add golden corn kernels or peas instead of chickpeas for a variation.
  • White bread can also be replaced with whole wheat bread if you are a little health conscious. Variations are endless though :)