Thursday, December 31, 2015

Rajma Masala Recipe / Red Kidney Bean Masala

     I greedily buy Rajma :P as though I cook regularly. Stacking Rajma and other pulses in the kitchen for a while, one fine day comes with someone nudging me to use them up, I put a handful of them for soaking overnight. Then if everything goes good (with my laziness talking a lazy nap and forgetting to bother me) the soaked lentil will be cooked and used up on the next day itself. If not, it visits the fridge for a day and then makes its appearance for a dish aaram se !!!
     This time, the soaked Rajma made its appearance without the sitting-in-the-fridge episode :) and we had a yummy Rajma masala to pair up with the chappathi.

Prep Time: overnight rajma soaking & steaming + 10 mins || Cook Time: 25 mins || Serves: 3 || Category: Side-dish for roti/chappathi

Ingredients:
1. Rajma (Red kidney beans) - 100 gm (soaked overnight & pressure cooked for 6-7 whistles)
2. Onion - 1
3. Oil - 2 tbsp
4. Bay leaves - 2
5. Cinnamon - 2 pieces
6. Cumin seeds - 2 tsp
7. Ginger garlic paste - 1 tsp
8. Turmeric powder - 1 tsp
9. Tomato - 1 large
10. Green chilli - 1 or 2 slit
11. Hing - 2 tsp
12. Kashmiri chilli powder - 2 tsp
13. Coriander powder - 2 tsp
14. Garam masala - 2 tsp
15. Salt - as required
16. Kasoori Methi (dry fenugreek leaves) - 2 tbsp
17. Fresh cream - 3 tbsp

Method:
1. Heat a pan with 2 tbsp of oil. Throw in the bay leaves, cinnamon and cumin seeds and fry them until a nice aroma comes. Then add finely chopped onion and saute for a min. Add ginger garlic paste and turmeric powder and cook until the onion starts becoming translucent.
2.  Add the slit green chilli, chopped tomatoes and give a stir. Saute until the tomatoes start to become mushy. Then add all the powders (Kashmiri chilli, Garam masala, Coriander powder, hing) and stir thoroughly. Cook for about 3-4 mins covered with the lid.
3. Add required amount of salt and then some water for the gravy to get cooked. Cook covered for 2 mins. Then add the pressure cooked rajma and mash a few of them in the gravy.
4. Allow the gravy to boil for 2 mins and let the gravy thicken. Now add fresh cream and kasoori methi crushed in between the palms. Give a quick stir and switch off the flame after a min.

Suggestions:
  • It is optional to use fresh cream & kasoori methi.
  • Rajma can be replaced with any other kind of soaked lentil.


Sunday, December 27, 2015

Kothamalli Podi Recipe (Corriander Thokku Semi-dry Recipe)


     Kothamalli podi is liked by everyone at home. It is a tasty side-dish/pickle for idly, dosa etc. With a drop of gingelly oil on it, it tastes so heavenly that I cant keep track of the number of idlies or dosas I had. Paati usually makes this when there is surplus corriander available. she makes this podi and shapes them into small rounds and stores them in an air tight container in fridge. Though this recipe is referred as podi, it is more semi-dry in consistency than the powdery form as implied by the name.
     Have made this couple of times, after coming to USA. When we buy 3 big bunches of coriander for a dollar from Lotte :P

Prep Time: 60 mins (including drying) || Grinding Time: 5 mins || Yields: 150 gm || Category: Pickle/Podi/Thokku

Ingredients:
1. Coriander leaves - 1 big bunch
2. Black Urad dal - handful
3. Dry red chilli - 1 (Based on the hotness)
4. Tamarind - 1 small piece
5. Hing - 1 small piece
6. Salt - as required
7. Gingelly oil - 1 tbsp

Method:
1. Wash the coriander leaves well and spread them on a clean dry cloth to dry for about an hour. Once they are dry, chop them roughly. In a kadai, add oil and roast urad dal till a nice aroma comes. Then add the dry red chilli and roast it. 

2. Remove from heat and transfer the ingredients to a plate for cooling. In the same kadai, add the tamarind and hing pieces and roast them for a min. Transfer it to the plate and let all the ingredients cool down to room temperature. 
3. Add all the roasted ingredients, salt, coriander leaves to a mixie jar and give a quick pulse. Open the lid and stir the contents well. Slowly grind the ingredients with intermittent stirring, into a coarse powder (semi- dry consistency without adding water).

Suggestions:

  • White urad dal can be used instead of black urad dal.
  • Keeps good for 4-6 days under refrigeration.

Tastes great with curd rice or idly dosa etc along w a drop of gingelly oil.

Thursday, December 10, 2015

Spicy Maida Biscuits Recipe

     The memory of these maida biscuits dates back to my school days when my paati used to make these in the evening before I get back from school. Usually she makes both the salt and the sweet version parallely. Whenever I am at home during the process of making these biscuits, my job will be to separate the diamonds from the chappathi kal and place them on a paper for drying. And then to turn the pieces the other side and ensure that they dry evenly. When it is the time to fry them in oil, I become so busy carrying the diamonds from the paper on to a plate in batches and back and forth to the kitchen and the place where the diamonds are laid for drying :P 
     I had felt it so magical to see the making of sweet version of this biscuit, as I will be always eager to see 2 instances of the process. One when the biscuits are just mixed with the warm sugar syrup which makes them look glossy and the other is a few mins after its resting period, when the sugar syrup gets solidified and show up in the biscuits as a white coating here and there :)
     Okay stories apart, now jumping in to the recipe....

Prep Time: 20 mins || Cook Time: 15 mins || Serves: 3 || Category: Fried snack/ Tea-time snack

Ingredients:
1. Maida - 1 cup
2. Omam (Ajwain seeds) -  1 tsp
3. Hing - 2 tsp
4. Pepper powder - 2 tsp
5. Chilli powder - 1 tsp
6. Salt - as required
7. Baking soda - 1 tsp (optional)
8. Oil - for frying

Method:

1. Mix all the ingredients in a wide bowl. Add water slowly and knead into a soft dough.
 2. Divide the dough into desired number of portions and make balls with it. Spread them on a flat surface evenly with a rolling pin. Cut the rolled dough into diamonds or any shape of desired size. Separate the pieces and air dry them over a paper for 10-15 mins.
 3. Heat oil and test for the optimum temperature by dropping a small portion of the dough. If the dough rises immediately and gets fried, the temperature is just right. Drop the cut biscuit pieces in batches and fry them until golden brown. Drain in paper towel and store in air tight containers after cooling.

Suggestions:

  • Baking soda is optional. 
  • Instead of adding chilli powder and salt in the dough, the fried biscuits can also be tossed with sprinkled chilli powder and salt.
  • Cumin seeds can also be added instead of ajwain seeds.
  • If desired, a tsp of ghee or oil can be used while kneading the dough.
Had a nostalgic evening with the biscuits and a glass of coffeeeeee....

Sunday, December 6, 2015

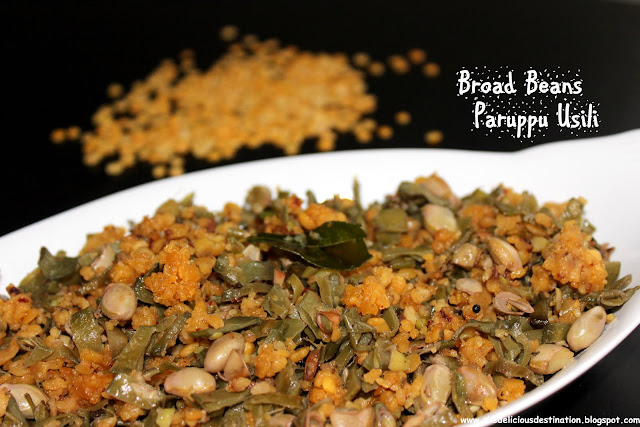
Avaraikkai Paruppu Usili Recipe / Broad Beans Paruppu Usili


     Paruppu usili is one of the tastiest variations that can be tried with broad beans/ normal string beans etc. This traditional recipe from Tamil Nadu, finds its place on a banana leaf in almost every TamBrahm wedding or function.
I have made this only a couple of times, as it involves a little extra work with respect to the dal part, when compared with the preparation of a usual side-dish. Though it pairs up well with any sambar or rasam, it tastes so perfect with morkootan/morekuzhambu.

Prep Time: 10 mins || Cook Time: 25 mins + cooking time for dal || Serves: 2 || Category: Side-dish / paruppu usili

Ingredients:
1. Avaraikkai (Broad beans) - 150gms
2. Toor dal - 50 gms
3. Red Chilli - 1 (As the red chillies are too hot here)
4. Hing - 3 tsp
5. Curry leaves - 1 sprig
6. Salt - as required
7. Oil - 2 tbsp
8. Mustard seeds - 1 tsp

Method:
1. Wash and cut broad beans retaining its seeds too. Wash the toor dal and chilli.
2. Grind the toor dal and chilli coarsely in a blender sprinkling very little water.
3. Spread the crumbled dal in a container and pressure cook for 5-6 whistles. Once cooked, separate the dal or crumble them again using a laddle or spoon or with hand.
4. In a kadai, heat a tbsp of oil and add the cooked toor dal , hing curry leaves and saute them for 2 mins and transfer to a plate. To the same kadai, add a tbsp of oil and let the mustard seeds splutter. Add the cut broad beans and give a stir.
5. Cook covered for 8-10 mins or until the broad beans gets cooked well and changes from fresh green to a dull green colour. Now add the cooked & sauteed dal and mix well with enough salt. Saute for 2-3 mins and switch off the flame.

Suggestions:

  • Toor dal can also be pressure cooked first and then coarsely ground in the blender.
  • Channa dal can also be used in the place of toor dal. Or a mix of toor dal and channa dal can be used too.
  • Coconut oil can be used instead of normal cooking oil, to give a nice aroma.

A splendid combination for morkootan/morkuzhambu !!!

Monday, November 30, 2015

Boondhi Laddu Recipe

     Boondhi laddu is one of the sweets that we usually make with ease for Diwali. I had been looking forward to try this sweet on my own. Had taken the final pics one day and the step wise pics the other time, as making the sweet + taking the pics makes it very tiresome !!! Apart from shaping the sweetened boondhis as laddus, we also have a practice of filling them in metallic cones which is traditionally called Parupu Thengai, finding its place in TamBrahm marriages and other auspicious functions. Though the Paruppu thengai is popular with sweet boondhi, it can also be made with many other fillings like, sweetened cashews, jaggery coated groundnuts, manoharam (jaggery coated thenkuzhal) etc.
     My mom is an expert in making laddus. She made big laddus in 3 batces for my engagement :) (I helped her a little in holding the laddle firmly, measuring the raw materials etc :P and then gobbling 2 or 3 laddus at every stage in return for my help !!)
     Also one special mention about these laddus is that they are adorning my blog as the 50th post in the completion of a 6 month old blogging journey !!! 

Prep Time: 20 mins || Cook Time: 50 mins + 20 mins for shaping laddus || Yields: 35 to 40 laddus || Category: Sweet

Ingredients:
1. Gram flour (Besan flour) - 3 cups
2. Sugar - 3 cups
3. Cooking soda (Sodium Bi-carbonate) - a pinch
4. Salt - a pinch
5. Food colour (red) - a pinch
6. Oil - as required to fry
7. Ghee - 4tbsp
8. Cardamom powder - 2 tsp
9. Sugar candy (diamond kalkandu) - 3 tbsp
10. Cashews - 10 to 15
11. Cloves - 8 to 10


Method:
1. Measure equal parts of besan flour and sugar separately and keep aside. For sugar syrup, dissolve the measured sugar in water (just needed for immersing the sugar in) and then switch on the stove. 
Add a pinch of sodium bi carbonate and a pinch of salt to the measured besan flour and mix well. Slowly add water and make a batter of slightly thick consistency. 
 2. Allow the sugar syrup to boil and reach a single string consistency. Switch off the flame. After 2-3 mins, add food colour and mix well. (I added a few drops of water to a pinch of food colour and mixed well and then transferred it slowly to the sugar syrup with constant stirring). Parallely heat required amount of oil in a kadai for making boondhi.
 3. Check the hotness of oil by dropping a little amount of the batter. If the batter rises and comes to the surface, the hotness of the oil is sufficient. Take a boondhi laddle and pour some batter on it and spread with a laddle quickly. Once the boondhis have occupied the space in the kadai, stop spreading with the laddle and clear the batter from the boondhi laddle into the batter container.
 4. Stir and turn the boondhis to their other side, to ensure uniform heat during the cooking process. After 2-3 mins, take the boondhi using a perforated laddle and transfer to the hot sugar syrup.
 5. Repeat the above process until all the batter is over. Finally, fry the cashews in ghee, cloves in oil (the cloves will splutter, so make sure to stand away from the hot oil) and add to the boonhis added to the sugar syrup. Also add cardamom powder and sugar candy and hot ghee and mix well. When it is warm enough to handle, make small rounds and set them aside for cooling.


Suggestions:

  •  If the batter is made to rest for a while, it slightly ferments. So, the batter for boondhi,  sugar syrup should be made parallely. As the sugar syrup gets done, say about 75% done, oil should be heated parallely for frying the boondhis. 
  • While making the sugar syrup, do not switch on the flame, until all the sugar has dissolved completely in normal water. If the sugar solution is heated, even before the sugar dissolves, it will lead to a brown syrup with caramelised sugar.
  • After adding the fried boondhis to the sugar syrup, if the stickiness of sugar is found to be less, then heat ghee and add to the boondhi in syrup which will make the sugar syrup become loose in the hotness of the ghee.
  • Also, boondhis can be added from hot oil directly into the sugar syrup, which will retain the sticky nature of the sugar syrup making it easy to shape them into laddus.


Yummy home-made boondhi laddus are ready !! They stay good for 8-10 days unrefrigerated.

Sunday, November 29, 2015

Broccoli Stir Fry Recipe

     Broccoli Stir Fry is the simplest recipe that I had tried with Broccoli to start with. Though not so much tasty as the Broccoli Bharta, this is a dish loaded with nutrients and can be made easily and quickly, to accompany a roti/phulka or for normal rice and sambar combo.
Without much to talk about the dish, let us head to the recipe directly :P

Prep Time: 10 mins || Cook Time: 25 mins || Serves: 2 || Category: Side-dish for rice/roti

Ingredients:
1. Broccoli - 1 small crown
2. Olive oil - 1 tbsp
3. Onion - 1 small
4. Cumin seeds - 2 tsp
5. Mustard seeds - 1 tsp
6. Urad dal - 2 tsp
7. Turmeric powder - 1 tsp
8. Hing - 2 tsp
9. Salt - as required
10. Pepper powder - 1 tsp
11. Chilli powder - 1 tsp

Method:
1. Cut broccoli into small florets, wash them and then cook them in water, adding a tsp of salt. Cook covered for about 5-7 mins or until the broccoli pieces turn soft. 
2. Once the broccoli is cooked, drain the water completely.
3.  In a pan/kadai, heat some olive oil and splutter the mustard seeds, cumin seeds and fry urad dal. Add roughly chopped onions, turmeric powder, hing and saute for 2 mins until the onions turn translucent. Add pepper powder and chilli powder and saute for 2 more mins.
4. Then add the steamed/cooked broccoli and give a quick stir. Cook covered for 3-5 mins and then switch off the flame.


I had it with the usual rice-sambar combo for lunch..

Friday, November 20, 2015

Broccoli Bharta Recipe


     I am a fan of Baingan Bharta (Brinjal gravy) as a side-dish for roti/phulka etc. Few days back I came across a twist of the recipe with Broccoli in the place of brinjal, in my friend Sreeraksha's blog here . Immediately I bookmarked it to try it some day. 
Had 2 crowns of Broccoli lying in the fridge. I made a stir fry with one and Broccoli Bharta with the other one. Was so happy and satisfied with the dish, as even broccoli could be given a tasty, inviting-to-eat form :P

Now, over to the recipe.........

Prep Time: 5 mins || Cook Time: 30 mins || Serves: 3 || Category: Side-dish for chappathi/roti

Ingredients:
1. Onion - 1 (medium size)
2. Tomato - 1 (medium size)
3. Broccoli - 1 small crown
4. Oil - 2 tbsp
5. Cumin seeds - 2 tsp
6. Ginger garlic paste - 2 tsp
7. Green chili - 1
8. Turmeric powder - 1 tsp
9. Hing - 2 tsp
10. Garam masala - 2tsp
11. Coriander powder - 2 tsp
12. Salt - as required
13. Boiled Rajma - handful (optional)
14. Lemon juice - from 1/2 lemon
15. Coriander leaves - 1 tbsp

Method:

1. Cut broccoli into small florets, wash them and then cook them in water, adding a tsp of salt. Cook covered for about 5-7 mins or until the broccoli pieces turn soft. 
 2. Once the broccoli is cooked, drain the water completely and mash it well using a laddle or a potato masher. (mashed broccoli is not shown here)
3. In the same pan, add oil and fry cumin seeds, ginger garlic paste, green chilli, onion and turmeric powder, hing. Saute till the onions turn translucent. Add chopped tomatoes, garam masala, coriander powder and mix well. Keep covered and cook for about 5-8 mins or until the tomatoes turn mushy.
4. Now add the mashed broccoli and mashed rajma (red kidney bean) and mix well. Add little water for the veggies to blend well and cook covered for 2 mins. Add required amount of salt and stir well. Cook for 2 mins and switch off. After the gravy has slightly cooled down, add some lemon juice and garnish with coriander leaves.

Suggestions:

  • Steamed/cooked broccoli can also be run in a food processor/mixie instead of mashing it manually.
  • Adding Rajma is optional. I added it as I had a lot of them soaked for some other gravy.
  • Garam masala can also be substituted with normal sambar powder.


I enjoyed the warm Broccoli Bharta with soft phulkas for breakfast !!!

Tuesday, November 3, 2015

Akki Roti Recipe (Rice flour roti)


     A famous breakfast dish from Karnataka's cuisine. Apart from this one-liner intro, for me personally, it carries good memories of my college days. In college, I had a kannadiga friend from whom I got to taste this roti during lunch. With the few rotis she brings for herself, she would also share a piece with us, the other 3 second benchers :)  Thats when I got hooked to its taste and aroma. Few months back I got this recipe from her over whatsapp. And I tried it out yesterday evening. Thanks Apoorva !! It turned out good and we enjoyed a new dish :)
     In a way it reminded me of the verum arisi adai (plain rice flour adai) that we make with a more liquid form of batter with murungai keerai. I can now add this dish, to the group of quick fix tiffins that can be made without a conventional dosa/idli batter.

Prep Time: 10 mins || Cook Time: 25 mins || Yields: 4 || Category: Breakfast/Tiffin

Ingredients:

1. Rice flour - 250gm
2. Onion - 1 (small)
3. Green chillies - 1 or 2
4. Hing - 2 tsp
5. Cumin seeds - 2 tsp
6. Grated coconut - 2 tbsp
7. Coriander leaves - 2 tbsp (finely chopped)
8. Ginger - 1 tbsp (finely chopped)
9. Salt - as required
10. Oil - as required

Method:

1. Mix the rice flour with finely chopped onion, green chillies, grated coconut ginger, hing, cumin seeds, coriander leaves and salt. 
2.  Add warm water little by little and make it a soft dough. Divide the dough into equal sized balls. Take a ball and spread it evenly on a butter paper/aluminium foil/banana leaf, greasing the hand with oil, slightly.
 3. Meanwhile heat a dosa pan or a wok. Carefully transfer the roti to the hot pan and cook in medium flame. Make a small hole in the middle, for the roti to get cooked. Cook covered for a min.
 4. Flip the roti to the other side drizzling enough oil. Cook the roti until it is slightly golden. Enjoy it hot with tomato chutney or any tangy dip of your choice.

Suggestions:

  • For a crunchy texture, add 2 tbsp of bengal gram (soaked for 30 mins in water & drained) or hyacinth bean (broad bean/avaraikkai).
  • Can also add finely chopped dill leaves for added flavour.
  • Always have the flame in medium for getting uniform well cooked rotis.
I had the roti with a tangy Amla pachadi..


Thursday, October 29, 2015

Mixed Fruit Jam recipe | Homemade mixed fruit jam


     I blindly have an impression that a jam is always by default - a mixed fruit jam. Because I always go for a mixed fruit kissan jam though there are special jams from solo fruits, which I have never bothered to buy. The visual appeal of a jam, as per me is convincing only if it is dark red in colour :P   Having the same thought, I started making this mixed fruit jam and then realized at a point that, the colour depends on the combination of the fruits, unless otherwise a specific artificial colouring agent is used !!! 
     Some of our friends, when they visited our house during Golu, brought in a variety of fruits, which kindled my interest to try a mixed fruit jam. So here comes the recipe without any preservatives or artificial colours.

Prep Time: 20 mins || Cook Time: 40 mins || Yields: 2 jars + little more || Category: Jam / Fruit Jam

Ingredients:
1. Very ripe banana - 2
2. Grapes (red/green) - 25
3. Red Apple - 1 or 2
4. Green Apple - 1
5. Pear - 1
6. Strawberry - 12 to15
7. Sugar - 200 gms (may vary as per the fruits used)
8. Lemon juice - 1 tbsp (optional)

Method:
1. Wash all the fruits and chop them roughly.
2. Grind the fruits in a blender into a smooth paste in batches without adding water. Can add a spoon of sugar if desired.
3. Mix all the fruit pulp in a saucepan and heat it in medium flame for 10 mins.
4. Add sugar and mix well. Cook in medium flame for 15-20 mins with periodical stirring.
5. After a while, scum (froth) starts to form on the surface after the added sugar dissolves.
6. Remove the formed scum periodically and discard it. Continue boiling in medium flame for 10 more mins. The mixture will turn slightly glossy and start spluttering vigorously. At this stage test the consistency of the jam by spreading it in a plate taken from freezer. If it does not ooze down and stands sticky and still, that is the right consistency. If not, boil for few more mins and then switch off the flame.

Suggestions:

  • Any combination of fruits can be used, based on the availability.
  • If adding lemon juice, it is better to add after switching off the flame and the heat has subsided a little. Otherwise lemon juice will add a bitter taste to the jam when heated for a long time. 
  • I have skipped lemon juice, as the pectin in the fruits will act as preservative & also as I will consume the jam within a short period.
  • Citric acid can also be added instead of lemon juice for preservation.
  • Can add a small piece of beetroot while grinding the fruits, for a bright red colour. 
  • The amount of sugar varies as per the sweetness of the fruits used.
  • Can also use artificial food colour too.

     I enjoyed the artificial colouring agent free, preservative-free, gelatin-free home made jam with bread, roti and variety of other foods :)